Any headers with the 🔗 next to it can be clicked to copy a direct link to it that can be shared.
jfgz is a practice utility for Jet Force Gemini. It has several features such as modifying your inventory, to viewing memory, or even changing the current playing music.
For the purposes of better readability the widescreen mode is permanently disabled.
Normally, even with widescreen disabled, the game temporarily enables it for cutscenes.
Unfortunately unlike other games such as Zelda 64 where black bars just cover the top and bottom of the screen, in Jet Force Gemini the entire viewport is squashed to achieve the effect.
This results in the menu text looking distorted if opened during a cutscene or with widescreen mode in general.
Controls
The menu is toggled by holding R, then pressing L.
This can be used at anytime to open or close the menu, however it does not work during load screens.
While the menu is enabled the game will be paused to prevent enemies from moving around or shooting the player.
- Use the
D‑padto navigate the menu,Ato make a selection, andBto go back. - Checkboxes can be toggled with
A. -
Counters can be adjusted by using
C‑upandC‑down. HoldingRthen using the C‑buttons will adjust values faster. - Options can be adjusted with
C‑upandC‑down, then useAto apply.
Some menus may use specific controls. See that menu's page for more details.
The Menu
Following the initial information in the manual comes the menu system. Click here to jump to straight to it.
Supported Games
- Jet Force Gemini (USA)
Unsupported Games
- Jet Force Gemini (Europe)
- Star Twins (Japan)
- Jet Force Gemini Demo (USA)
The patcher will recognize all of these ROMs, but it will only allow supported ones to be used.
Using the Patcher
With the patcher open use the open ROM button and load your ROM. Once it is opened the settings available will be shown. Adjust the settings to your liking then use the build ROM button. A new ROM will be built creating the jfgz ROM with your chosen settings. Once building has finished you will be asked to save the new ROM.
Using jfgz
Load the ROM on to a flashcart and play it on your Nintendo 64 console or alternatively load the ROM in any Nintendo 64 emulator. Emulator compatibility is not gauranteed, however if possible make sure to change the emulator's core CPU style to interperter.
Various actions will cause a message to display on screen regarding it. These messages are bound to the bottom left corner of the screen. A total of four messages for the last four actions will display. After a short amount of time the message will fade out.
In the image below are some examples.
RAM Watches are very basic and currently do not support labels. Any watches used are up to the player to remember what they are. Potentially in the future support for labels may be added.
Ranges
Each type of watch has a limited range of values it can be.
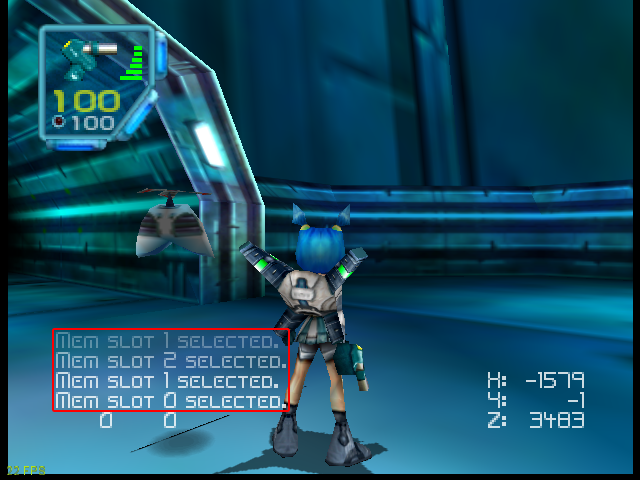
8‑bit)16‑bit)32‑bit)0 to 2550 to 655350 to 4294967295-128 to 127-32768 to 32767-2147483648 to 21474836470x00 to 0xFF0x0000 to 0xFFFF0x00000000 to 0xFFFFFFFF±1.18×10‑38 to ±3.4×1038A mem file is sort of a mini-savestate. There are three slots that can be used to save different mem files. They are not full savestates which would save the entire state of the game. Instead a mem file only saves a small amount of data that pertains to the game's current state. This data can then be loaded back to restore it.
What is saved?
A few different things are saved. The main information though are general global flags such as having talked to an NPC, what ship parts are collected, Robot Mission medals, etc. Each character's data also gets saved which includes their current weapons, ammo, capacity, keys, objects, etc. For regions the current tribal and enemie states are also saved.
Using a Mem File
There are a few button combinations that can be used for mem files and they are as follows:
- Save:
R + D-pad Right - Load:
R + D-pad Left - Change Slot:
R + D-pad UpandR + D-pad Down
Features settings pertaining to the current completion of the game.
Characters Unlocked
The currently unlocked characters that are available to the player.
- Juno
- Vela
- Lupus
- Floyd
Inventory
The inventory for each character.
Levels
The current levels the character has unlocked.
- Goldwood
- SS Anubis
- Tawfret
- Sehkmet
- Cerulean
- Ichor
- Spawnship
- Rith Essa
- Eschebone
- Mizar's Palace
- Spacestation
- Gem Quarry
- Walkway
- Water Ruin
- Asteroid
Keys
The current keys the character has collected.
- Blue Key
- Green Key
- Magenta Key
- Yellow Key
- Red Key
-
Tri-Rocket Launcher Key
A key that is automatically given to a character as soon as they collect the Tri-Rocket Launcher. There are a few doors in the game that use this key to keep the player from progressing until they aquire the weapon.
Objects
The current objects the character has collected.
- Arcade Chip
- Ear Plugs
- Goldbar 1
- Goldbar 2
- Goldbar 3
- Night Vision Goggles
- Crowbar
- Pants
- Mine Key
- Specialist Magazine
Weapons
The characters current weapon data.
Weapon Switch
Toggle being able to switch between different weapons.
This must be enabled or switching is prevented.
The developers used this to prevent switching until a second weapon is collected.
Collected
The current weapons the character has collected and can switch between.
- Pistol
- Homing Missiles
- Machine Gun
- Plasma Shotgun
- Shocker
- Tri-Rocket Launcher
- Flamethrower
- Sniper Rifle
- Grenades
- Shuriken
- Fish Food
- Timed Mines
- Remote Mines
- Flares
- Cluster Bombs
-
Splitter
An extra weapon in the game that is not normally accessiable. It doesn't have it's own icon so it just uses a Grenade icon. There is also no weapon model so when shooting bullets they appear to come out of the characters hand.
Ammo
The current ammo the character has for each weapon.
- Pistol
- Homing Missiles
- Machine Gun
- Plasma Shotgun
- Shocker
- Tri-Rocket Launcher
- Flamethrower
- Sniper Rifle
- Grenades
- Shuriken
- Fish Food
- Timed Mines
- Remote Mines
- Flares
- Cluster Bombs
- Splitter
Minimum: 0
Maximum: 999
Capacity
The current capacity the character has for each weapon.
- Pistol
- Homing Missiles
- Machine Gun
- Plasma Shotgun
- Shocker
- Tri-Rocket Launcher
- Flamethrower
- Sniper Rifle
- Grenades
- Shuriken
- Fish Food
- Timed Mines
- Remote Mines
- Flares
- Cluster Bombs
- Splitter
Minimum: 0
Maximum: 999
Gemini Holders
The amount of gemini holders, or links on the health meter, the character has.
Minimum: 6
Maximum: 12
Mizar Tokens
The current amount of tokens the character has.
Head Counts
The amounts of each type of head the character has collected.
Minimum: 0
Maximum: 999
Tribal Heads
The amount of tribal head the player has collected.
Drone Heads
The amount of drone head the player has collected.
Ship Blueprint
The twelve ship parts that can be collected throughout the game. Toggle between having each one or not.
- Juno's Hatch Key
- Vela's Hatch Key
- Lupus' Hatch Key
- Nitrogen Tank
- Oxygen Tank
- Stabilizer
- Power Cell
- Radar Dish
- Fin
- Cargo Bay Key
- Deflector Shield
- Fuse
Robot Components
The different component pieces that make up Floyd. This visually display in the pause menu in the inventory, however they do not actually control or affect whether Floyd will be unlocked. To unlock Floyd use the toggle under Unlocked Characters.
- Top
- Right
- Left
Robot Missions
The medals for each of the five Robot Missions.
- Goldwood Robot Mission
- SS Anubis Robot Mission
- Ichor Robot Mission
- Eschebone Robot Mission
- Mizar's Palace Robot Mission
This are all options.
Once the desired one is selected, use the A button to set it.
Flags
General flags for various things throughout the game.
Data pertaining to regions.
Continues
The amount of continues the player currently has.
Minimum: 0
Maximum: 99
Tribals
The current tribals in the region.
Minimum: 0
Maximum: 16
- Rescued
- Killed
- Remaining
Weapon Counts
During play of a region the game keeps track of various weapon stats. These are then used to calculate the information to display on the "Area Cleared" screen on a region exit.
Fire
The amount of bullets fired from each weapon.
A special case here is the Tri-Rocket Launcher.
Each shot counts as one "bullet" even though there are three rockets that spawn per shot.
This allows it to get a higher accuracy than 100%.
- Pistol
- Homing Missiles
- Machine Gun
- Plasma Shotgun
- Shocker
- Tri-Rocket Launcher
- Flamethrower
- Sniper Rifle
- Grenades
- Shuriken
- Fish Food
- Timed Mines
- Remote Mines
- Flares
- Cluster Bombs
- Splitter
Hit
The amount bullets fired from each weapon that hit an enemie.
- Pistol
- Homing Missiles
- Machine Gun
- Plasma Shotgun
- Shocker
- Tri-Rocket Launcher
- Flamethrower
- Sniper Rifle
- Grenades
- Shuriken
- Fish Food
- Timed Mines
- Remote Mines
- Flares
- Cluster Bombs
- Splitter
Kill
The amount enemies killed by each weapon.
- Pistol
- Homing Missiles
- Machine Gun
- Plasma Shotgun
- Shocker
- Tri-Rocket Launcher
- Flamethrower
- Sniper Rifle
- Grenades
- Shuriken
- Fish Food
- Timed Mines
- Remote Mines
- Flares
- Cluster Bombs
- Splitter
Room Enemies
Settings that affect enemies in a region.
Reset Current Room
This option will reset all of the enemies in the room that the player is currently in only. The room must be reloaded for it to take effect.
Clear Current Room
This option will clear all of the enemies in the room that the player is currently in only. The room must be reloaded for it to take effect.
Reset All Rooms
This option will reset all of the enemies in all rooms thoughout the entire region. The current room must be reloaded for it to take effect there.
Features a full list of locations to warp to. Manual warping is also possible by setting a scene and spawn point.
Locations
The list of locations throughout the game that the player can warp directly to.
Boot Logo
This option acts as sort of a console reset as it will rerun the boot logo sequence.
Title Screen
Will take the player directly to the title screen.
File Select
Takes the player directly to the file select screen where they can choose one of the six files to play on.
Character Select
This option will take the player the ship character select screen. (Where they walk on the treadmills)
Levels
A more in‑depth list by specific levels. Each levels has it's list of regions, then each area in that region.
Boss Battles
List of the boss battles in the game. Selecting one will take the player to that boss battle.
Races
List of the different races in the game.
Scene
Manually set a scene. Scenes are zero index. Then by using the Trigger option the player will be warped to it.
There are some scenes that are not used and some can crash the game.
Minimum: 0x0000
Maximum: 0x019C
Spawn Point
Manually set a spawn point. Spawn points are zero indexed. Then by using the Trigger option the player will be warped to it.
If the spawn point is set to a higher value than what exist for the scene the game has a built in safty.
Instead of the game potentially crashing (by reading out of bounds data) it will instead spawn the player at position 0, 0, 0.
This location is not always in-bounds.
Minimum: 0
Maximum: 16
Character
This list can be adjusted using C-up and C-down.
Once the desired character is selected, use the A button to set it.
Once set, selecting an option from the Locations list or selecting the Trigger option will warp the player as well as switch to the set character.
Trigger
Selecting this option will trigger a warp and take the player to currently set Scene and Spawn Point. It will also change to the set Character, if one was set.
Internal Name
A display of the internal name of the currently loaded map.
Add custom RAM Watches to display arbitary values of the game's memory on screen in real-time. Watches only display when the menu is closed and are always right aligned. That makes the bottom right corner the anchor for the display.
Selecting the + at the top will add a new RAM Watch to the list.
With a RAM Watch selected press A to edit it.
Once editing D-pad Left and D-pad Right can be used to switch properties.
Maximum: 14
Properties
There are a few properties of RAM Watches that affect what and where it will display.
Remove
Selecting the × will remove the RAM Watch from the list.
Address
The address is displayed in Hexadecimal.
The lower 6 digits can be adjusted.
The value range for each digit is 0 to F.
Jet Force Gemini does not make use of the Expansion Pak which limits the memory range to 80000000 to 803FFFFF.
Maximum address: 803FFFFF
Type
u8One‑byte value, unsigned integer.s8One‑byte value, signed integer.x8One‑byte value, hexadecimal integer.u16Two‑byte value, unsigned integer.s16Two‑byte value, signed integer.x16Two‑byte value, hexadecimal integer.u32Four‑byte value, unsigned integer.s32Four‑byte value, signed integer.x32Four‑byte value, hexadecimal integer.
Show
A toggle to control whether the RAM Watch should display or not.
By default a watch is set to not be shown.
A RAM Watch will only display on screen if this property is toggled true.
Location
The x, y position to display the RAM Watch at on screen.
Use the four C-buttons to adjust.
Hold the R button to adjust faster.
This menu has debug features that can help with testing things.
Memory
Allows for viewing of the main memory domain.
Defaults to starting at address 80000000.
D-pad Left and D-pad Right can be used to switch between the lower six digits of the address.
D-pad Up and D-pad Down can be used to adjust the digit which can range from 0 to F.
Addresses are on the left hand side, along the top are the offsets. The values at each address and offset display in a grid on screen. Each row shows eight bytes of data.
Heaps
Allows for viewing the lists of data currently loaded in the dynamic memory regions of the game.
Heap 0
Contains moduals and some textures.
Heap 1
This heap generally consists of the actors.
Properites
The properties of each heap entry.
Address
The RAM address where the data starts.
Size
The size (in bytes) of the data.
Mod
?
Offset
?
Various settings that can be used.
Display Input
Displays player 1's controller input along the bottom of the screen.
This is anchored to the bottom left corner of the display bounds.
The two numbers that display first are the joystick's x axis and y axis and are always visible.
Following them will be a string of circles that are colored to represent each button and will only be visible while a button is pressed.
Display Position
Display's the player's position in the current scene they are in.
This is anchored to the bottom right corner of the display bounds.
Display Region Time
Display's the time the player has been in the current region.
This is anchored to the bottom right corner of the display bounds.
Display Game Time
Display's the time the player has been playing on the current file.
This is anchored to the bottom right corner of the display bounds.
In game time only includes time actually spent playing while in control of a character. This means that time spent watching cutscenes or in the pause menu, for example, do not count and will not add onto the time.
Display Tracked Tribals
In jfgz a mod is applied that keeps track of tribals on a per region basis.
With this feature toggled true upon rescue or death of a tribal a message will display reflecting it's state with a timestamp.
Built in cheats that can be used.
Rainbow Blood
The normal in-game cheat that applies random colors to blood drops.
Jet Force Kids
The normal in-game cheats that adjusts the character models to look younger.
Ants as Pants
The normal in-game cheats that changes soldier drones into Mr. Pants.
Infinite Ammo
Even when out of ammo the player will still be able to use it and the ammo will be set to 99.
This cheat already normally exists in the game, however there is no toggle to enable it.
Infinite Health
When the player runs out of health instead of dying the meter will be refilled back to full. This cheat already normally exists in the game, however there is no toggle to enable it.
Levitate
Press and hold the L button to slowly levitate into the air.
Fill Jet Fuel
Hold the R button and press D-pad Up to activate.
A message will display to signify the cheat was activated.
Rapid Fire
Weapons no longer have any delay or cool down.
Throughout the game the player can transform into other characters at various points. There are many more available than are used in the main single player game. This menu allows you to change into those characters.
Be warned that changing models, especially very quickly, can cause the game to crash! This is probably why there's a decent delay with model changes normally in-game.
Juno's Models
- Juno
- Juno (Jet Pack)
- Juno (Jet Pack) Unused
- Sniper Drone
- Termite Drone
- Armor Drone
- Stag Drone
- Weevil Drone
- Cyborg Drone
- Zombie Drone
- Male Tribal
Vela's Models
- Vela
- Vela (Jet Pack)
- Vela (Jet Pack) Unused
- Soldier Drone
- Coward Drone
- Female Tribal
Lupus' Models
- Lupus
- Lupus (Jet Pack)
- Lupus (Jet Pack) Unused
Note that it is possible to mismatch characters and models using this menu. Be warned that characters and models are not inherently compatiable. A mismatch can result in strange effects or possibly crash the game.
The Unused models for each character appear to be some sort of low poly verion.
Possibly making them an early low level of detail version that was just left in the game after they were updated.
This menu can play various sound effects from the game.
This menu allows the player to change which song is currently playing.
No Music
Turn the current playing music off.
Boot Logo
Play the boot up music when the game normally starts.
Title Screen
Play the song from the title screen menu.
File Select
The ambient hum that can be heard on the file select screen. It is also used on Walkway.
Character Select
Play the song from the character select where they are on the ship and walk on treadmills.
Boss Battle
Play the boss battle theme.
Region Exit
Play the music that plays on the "Area Cleared" screen at the exit of a region which shows tribal and weapon stats.
Telephone
Play the ambient background song that is probably most known from the initial Hub area on SS Anubis.
Levels
Play music from the different levels of the game.
Disco
Play the music that is available in the Big Bug Fun Club.
Unused
Play music tracks that are not used anywhere in the game but still exist in the ROM.
Display's information about this practice utility.